My lovely followers

Sunday 16 February 2014

Wedding dress to a book.....D

It's time for the pinkies challenge this week.  

A colleague of mine gave me her beautiful wedding dress t use in my art and let me tell you it has taken me 2 months to cut into it as it was so beautiful.  I made her a pin cushion book as a memento of her wedding dress.  I will be making my own pins for the book - the pre made ones are just props lol. I got the idea from Jennings644 on youtube - go check her out - fab projects and tutorials.

I won't be rattling on and on so I will just list what I used for this project.

Ingredients

satin from dress
lace and applique from the dress train
edging lace from my stash

And that is that lol

First are the pics of the lace from the dress all spread out on table and also the bodice


Now for my project


Anyway thats it from me tonight.  Hope you enjoyed your visit and please call back again soon.

Hugz and love 

Saturday 15 February 2014

Just because I can....D

I actually felt like putting something together for the sake of it.  Not sure what I will do with it yet lol.  I had seen a video on you tube Jennings644 showing how to make a birdcage using chipboard base and wire.  

I already had some paper covered wire and chipboard which I cut into a semi circle.  I cut 6 wires all the same length - obviously lol.  I made holes in the base and glued the wires in.  I then bent them towards the back and glued them in place.  I cut a couple of cocktail sticks for the perches and found small wooden birds to use for inside the cage.  I used tiny pink lace for the base of cage - four layers.  I used grey feathers inside the base to give it a little more, you know - feathery lol. 

I made a bow out of scrap ribbon and adhered to top of cage.  I painted the canvas and cage in lilac paint.  I sprayed perfect pearls over the background.  I then used a dylusions mask and modelling paste for the edging.  I painted some flowers and leaves in my stash using same colour.  I used white buff over the raised edges. To finish it off I found an old pearl droplet earring, took it apart and placed on the front of cage to give a blingy look.  

Now for the pics and sorry there are so many.


Thank you for popping in to see me.  Please call back soon

Saturday 8 February 2014

In shock......D

due to actually making a card - this has not happened for such a long long time.  I just could not bring myself to colour an image and put together a card lol. - I found that I could today and I needed a birthday card ( this card can be used for anything as birthday not mentioned!) - I just love Wellington bear x

Here is the first image I coloured in using Kraft card and prisma pencils SUNTANNED WELLINGTON lol.  I took the image into a work and one of the trainees now owns him lol


For the card I actually made I used white card as the image base and coloured using copics and prisma pencils.  The corrugated card, papers, buttons are from my stash.  The tiny envelope and tag I put together. I distressed the edges of paper and card and wiped DI on edges.

Hope you like.


Thank you for dropping by and I do hope you call by again.  


This has been entered into the following challenges


Sunday 2 February 2014

Butterflies dancing.....D

Hey everyone - welcome to my blog - again !!!

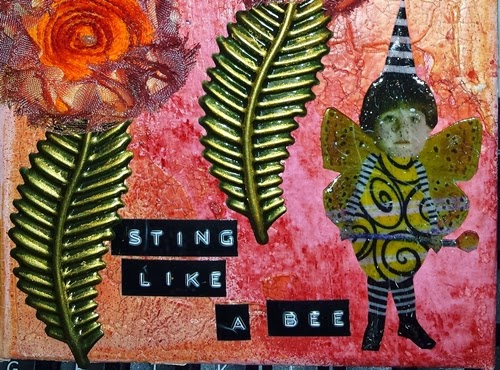
For our first challenge of 2014 over at Eclectic Ellapu, the theme is use texture. I decided on yet another canvas - I know I am getting boring lol.  I decided to try some thing different from my usual style and am unsure as to what I think of it lol.

I will just list all the items I used here as I am so tired and need to get to bed lol.

Canvas
peach and yellow paint
red, orange and yellow dylusions
2 fabric flowers coloured with dylusions
Crackle paste
metal butterly and leaves as the flower stems
gold rub n buff
image from Lisa's Altered Art

Now  for the pics


Hugz always

Saturday 1 February 2014

Get me outta here... I'm armless!...D

Well here we are with the first challenge of 2014 for the Altered Eclectics.   The theme as usual is Anything Goes - so out come the canvas lol.

I wanted to use some skeletons - I just love them as so humorous.  I used a brick mask and modelling paste for the background using black and silver to highlight the bricks.  For the mound of rubbish I applied a lot of black tissue paper to give diension.  Needed alot for the skeleton to sit on top just pondering what to do next.  I cut up one skellie to spread parts of body in the pile of refuse.  One skellie looking over the wall to help the one out who has lost his arm severed from elbow while their buddy sits and watches all the action and decides to chill out.(and no skellies do not bleed lol).

Well that is it I am afraid, not much else to say except come on over and join in with out new challenge - we would love to see you all.

Now for the pics


Hugz and love as always


LinkWithin

Related Posts Plugin for WordPress, Blogger...